[Flutter] 위젯(Widget) 알아보기 - Scaffold
leteu
·2023. 3. 4. 21:16

Flutter 레이아웃 잡는 위젯에 대해 포스팅해보려고 한다.
개발해보면서 많이 사용해본 것들 위주로 올리려고 한다.
#1 Scaffold ( 스캐폴드 )
https://api.flutter.dev/flutter/material/Scaffold-class.html
Scaffold class - material library - Dart API
Implements the basic material design visual layout structure. This class provides APIs for showing drawers and bottom sheets. To display a persistent bottom sheet, obtain the ScaffoldState for the current BuildContext via Scaffold.of and use the ScaffoldSt
api.flutter.dev
나는 공식 문서를 볼 때 예제보단 프로퍼티 목록을 먼저 확인한다.
이 포스트에선 아래 3가지 정도만 알아보려고 한다.
- appbar : 상단 바
- drawer : 상단 바에 들어가는 슬라이드 메뉴
- body : 화면 들어갈 곳 (본체)
- bottomNavigationBar : 하단 메뉴
class MainLayout extends StatefulWidget {
  const MainLayout({Key? key}) : super(key: key);

  @override
  _MainLayoutState createState() => _MainLayoutState();
}

class _MainLayoutState extends State<MainLayout> {

  @override
  Widget build(BuildContext context) {
    return Scaffold(
      appBar: ,
      drawer: ,
      body: ,
      bottomNavigationBar: ,
    );
  }
}
#2 AppBar
AppBar 위젯을 넣어주면 상단 바가 생긴다.
AppBar 안쪽에 title을 넣어주면 텍스트를 넣어줄 수 있다.
...
	return Scaffold(
		appBar: AppBar(title: const Text('Title')),
	);

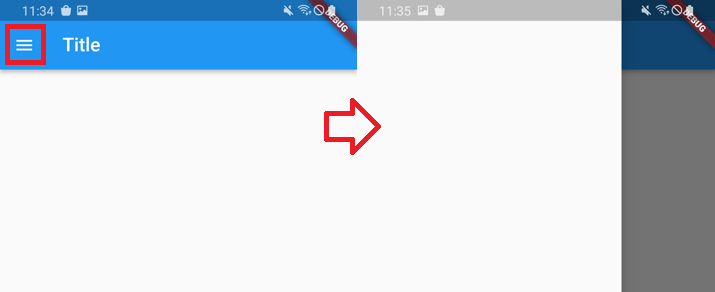
#3 drawer
Drawer 위젯을 넣어주면 햄버거 메뉴 아이콘이 생긴다.
child 안에 원하는 위젯을 사용하여 만들어주면 된다.
...
	return Scaffold(
		appBar: AppBar(title: const Text('Title')),
		drawer: Drawer(
			child: Column(children: [],),
		),
	);

#4 BottomNavigationBar
이 친구가 조금 까다롭다.
https://api.flutter.dev/flutter/material/BottomNavigationBar-class.html
BottomNavigationBar class - material library - Dart API
A material widget that's displayed at the bottom of an app for selecting among a small number of views, typically between three and five. The bottom navigation bar consists of multiple items in the form of text labels, icons, or both, laid out on top of a
api.flutter.dev
공식 문서를 확인해보면 뭐가 많다.
지금 사용해볼 프로퍼티만 설명하자면
- type : 하단 메뉴가 계속 붙어있을지 말지 결정해주는 친구
- items : BottomNavigationBarItem 위젯으로 이루어진 리스트 ( 하단 메뉴 목록이라고 생각하면 편하다 )
- backgroundColor : 하단 메뉴 배경 넣어주는 친구
- showUnselectedLabels : 선택 안된 메뉴들의 라벨 텍스트가 보이게 할지 말지
- selectedItemColor : 선택된 메뉴 색상
- unselectedItemColor : 선택 안된 메뉴 색상
- currentIndex : 현재 선택된 메뉴가 몇 번째 인덱스인지
- onTap : 얘는 지금 선택한 메뉴의 인덱스를 아규먼트로 돌려는 친구
우선 하단 메뉴 타입 지정과 메뉴 목록부터 만들어보자.
    bottomNavigationBar: BottomNavigationBar(
    	type: BottomNavigationBarType.fixed,
		items: const [
			BottomNavigationBarItem(
				label: 'Todos',
				icon: Icon(Icons.list)
			),
			BottomNavigationBarItem(
				label: 'Albums',
				icon: Icon(Icons.album)
			),
			BottomNavigationBarItem(
				label: 'Comments',
				icon: Icon(Icons.comment)
			),
			BottomNavigationBarItem(
				label: 'Posts',
				icon: Icon(Icons.local_post_office)
			),
			BottomNavigationBarItem(
				label: 'Users',
				icon: Icon(Icons.account_circle)
			),
		],
	),
Type은 BottomNavigationBarType 안에 fixed로 쓸 거다. ( shifting 쓰면 쓸어내렸을 때 없어진다. )
이렇게 쓰면 메뉴가 나오긴 나오지만 배경 색상이 없어 보이지도 않는다.
색상을 입혀주자
backgroundColor: Colors.blue,
selectedItemColor: Colors.white,
unselectedItemColor: Colors.white.withOpacity(0.38),
처음에 backgroundColor만 주고 배경색이 안 들어가길래 한참 헤맸다.
selectedItemColor, unselectedItemColor도 같이 넣어줘야 들어가더라...
이제 메뉴를 클릭했을 때 선택된 메뉴가 변경되도록 해주자.
클래스 상단에서 정수형 변수 하나 선언해주자
class _MainLayoutState extends State<MainLayout> {
  int _selectIndex = 0;
  ...
선언한 변수명으로 currentIndex를 잡아주고 onTap에선 클릭 시 메뉴가 변경되도록 해주자
currentIndex: _selectIndex,
onTap: (index) => setState(() {
  _selectIndex = index;
}),
State안에 값 변경은 setState함수에 콜백 안에서 해준다.
완성된 bottomNavigationBar
bottomNavigationBar: BottomNavigationBar(
	items: const [
		BottomNavigationBarItem(
			label: 'Todos',
			icon: Icon(Icons.list)
		),
		BottomNavigationBarItem(
			label: 'Albums',
			icon: Icon(Icons.album)
		),
		BottomNavigationBarItem(
			label: 'Comments',
			icon: Icon(Icons.comment)
		),
		BottomNavigationBarItem(
			label: 'Posts',
			icon: Icon(Icons.local_post_office)
		),
		BottomNavigationBarItem(
			label: 'Users',
			icon: Icon(Icons.account_circle)
		),
	],
	type: BottomNavigationBarType.fixed,
	backgroundColor: Colors.blue,
	selectedItemColor: Colors.white,
	unselectedItemColor: Colors.white.withOpacity(0.38),
	currentIndex: _selectIndex,
	onTap: (index) => setState(() {
		_selectIndex = index;
	}),
),
#5 Body
body는 그냥 위젯 집어넣으면 되지만 우린 하단 메뉴 쓸 거니까 그냥 집어넣는 건 멋이 없다.
하단 메뉴 누를 때마다 화면이 바뀌게 해 보자.
클래스 상단에서 body에 들어갈 위젯 리스트를 만들어주자
class _MainLayoutState extends State<MainLayout> {
...
	final List<Widget> _bodyOptions = const [
		Center(
			child: Text('Todos'),
        ),
        Center(
            child: Text('Albums'),
        ),
        Center(
            child: Text('Comments'),
        ),
        Center(
            child: Text('Posts'),
        ),
        Center(
            child: Text('Users'),
        )
	];
...
후에 선언한 리스트 변수에서 인덱스로 값을 찾는 함수를 body에 넣어주면 화면이 바뀌게 된다.
body: _bodyOptions.elementAt(_selectIndex),
#6 전체 소스 코드 / 화면

import 'package:flutter/material.dart';

void main() {
	runApp(const MyApp());
}

class MyApp extends StatelessWidget {
	const MyApp({Key? key}) : super(key: key);

	@override
	Widget build(BuildContext context) {
		return MaterialApp(
			title: 'Flutter Demo',
			theme: ThemeData(
                primarySwatch: Colors.blue,
            ),
			home: const MainLayout(),
		);
	}
}

class MainLayout extends StatefulWidget {
	const MainLayout({Key? key}) : super(key: key);

	@override
    _MainLayoutState createState() => _MainLayoutState();
}

class _MainLayoutState extends State<MainLayout> {
	int _selectIndex = 0;

	final List<Widget> _bodyOptions = const [
        Center(
            child: Text('Todos'),
        ),
        Center(
            child: Text('Albums'),
        ),
        Center(
            child: Text('Comments'),
        ),
        Center(
            child: Text('Posts'),
        ),
        Center(
            child: Text('Users'),
        )
	];

	@override
	Widget build(BuildContext context) {
		return Scaffold(
			appBar: AppBar(title: const Text('Title')),
			drawer: Drawer(
				child: Column(children: [],),
			),
			bottomNavigationBar: BottomNavigationBar(
				items: const [
                    BottomNavigationBarItem(
                        label: 'Todos',
                        icon: Icon(Icons.list)
                    ),
                    BottomNavigationBarItem(
                        label: 'Albums',
                        icon: Icon(Icons.album)
                    ),
                    BottomNavigationBarItem(
                        label: 'Comments',
                        icon: Icon(Icons.comment)
                    ),
                    BottomNavigationBarItem(
                        label: 'Posts',
                        icon: Icon(Icons.local_post_office)
                    ),
                    BottomNavigationBarItem(
                        label: 'Users',
                        icon: Icon(Icons.account_circle)
                    ),
				],
                type: BottomNavigationBarType.fixed,
                backgroundColor: Colors.blue,
                selectedItemColor: Colors.white,
                unselectedItemColor: Colors.white.withOpacity(0.38),
                currentIndex: _selectIndex,
                onTap: (index) => setState(() {
                    _selectIndex = index;
                }),
			),
			body: _bodyOptions.elementAt(_selectIndex),
		);
	}
}'프로그래밍 > Flutter' 카테고리의 다른 글
| [Flutter] 위젯(Widget) 기초 - text, icon, button 등등 (0) | 2023.03.04 |
|---|---|
| [Flutter] Flutter 1 - 설치부터 빠르게 (0) | 2023.03.04 |
| [Flutter] API 불러오고 사용하기 (0) | 2022.01.25 |
 leteu / 개발 블로그


